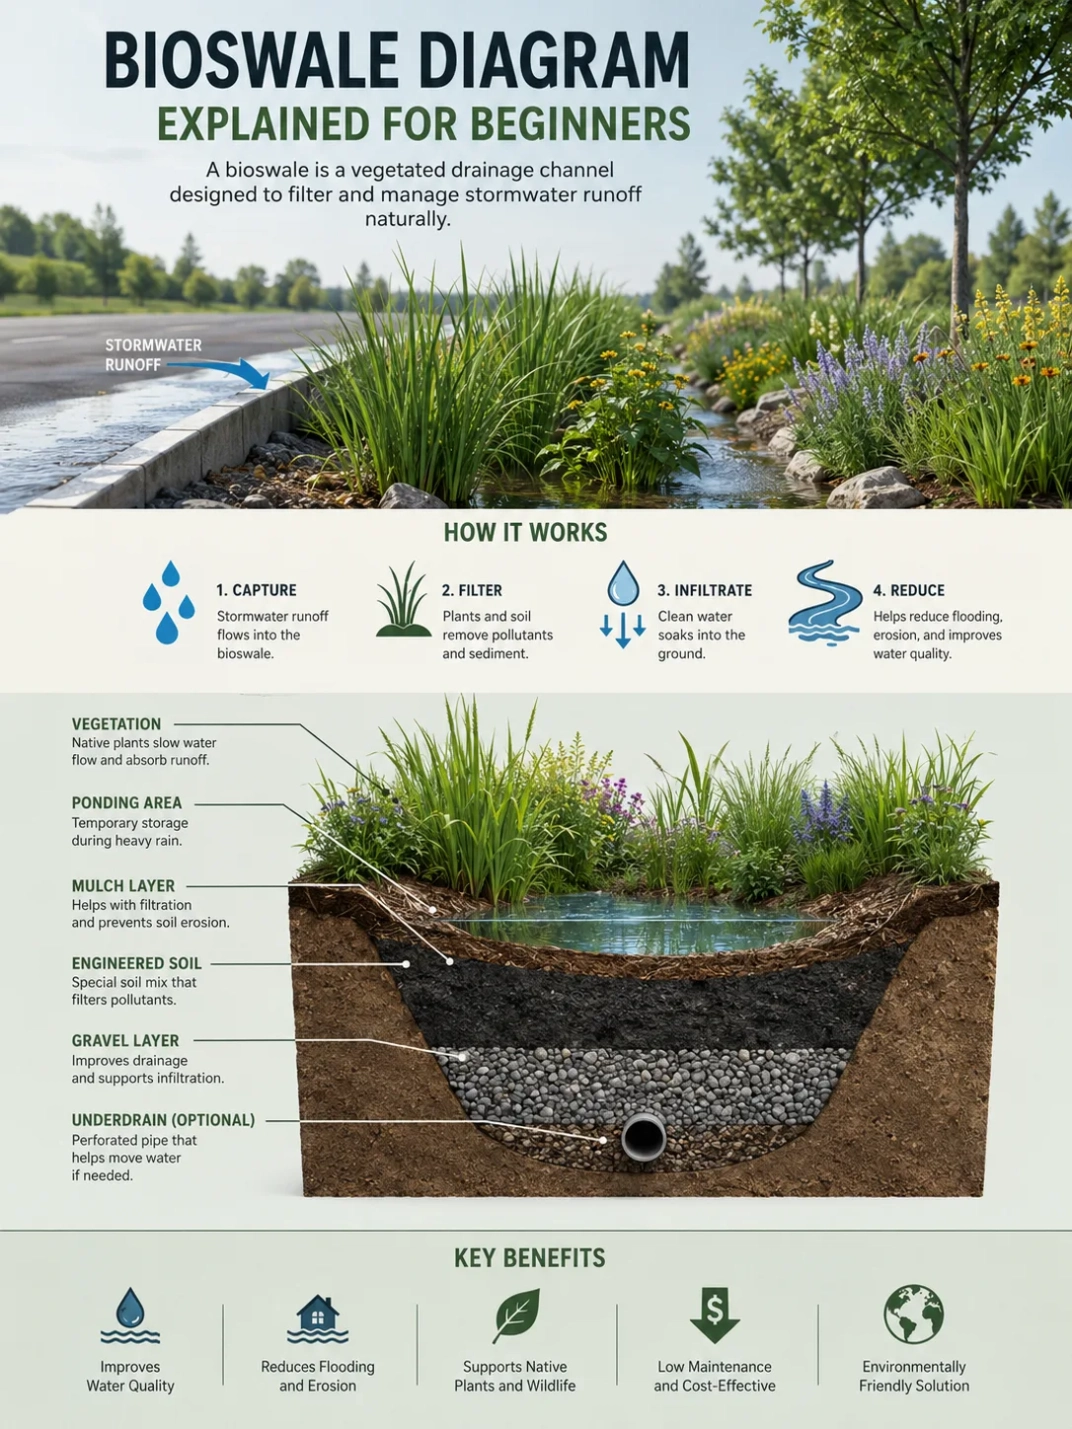
A bioswale diagram shows how stormwater moves from a hard surface into a shallow planted channel, slows down, filters through vegetation and soil, then leaves through infiltration, an outlet, or an overflow route. For beginners, the most useful way to read the diagram is not as a landscaping picture, but as a simple water path: runoff enters, spreads out, slows down, filters, and drains safely.
A good diagram does more than label plants. It shows where water comes from, how deep it may pond for a short time, which soil layer handles filtering, and where excess water goes during larger storms. Those details explain why a bioswale is different from a plain ditch, a flower bed, or a dry creek bed.
How to Read a Bioswale Diagram
Most bioswale diagrams are drawn as a side section, a top view, or a simplified flow sketch. Each type answers a different question.
| Diagram View | What It Helps Explain | Beginner Reading Tip |
|---|---|---|
| Side Section | Depth, soil layers, ponding area, underdrain, and overflow height. | Look from top to bottom: water surface, plants, mulch, soil media, drainage layer. |
| Top View | Shape, inlet location, flow direction, check dams, and outlet route. | Follow the arrows from the runoff source to the exit point. |
| Flow Diagram | How runoff moves, slows, filters, infiltrates, or bypasses during heavy rain. | Read it like a sequence, not a plant layout. |
| Planting Zone Diagram | Where wet-tolerant, dry-tolerant, and slope-stabilizing plants may fit. | Check which plants sit in the bottom, side slope, and upper edge. |
Design Note: A bioswale diagram is usually simplified. Real designs depend on rainfall, soil texture, slope, available space, local drainage rules, and how much runoff enters the swale.
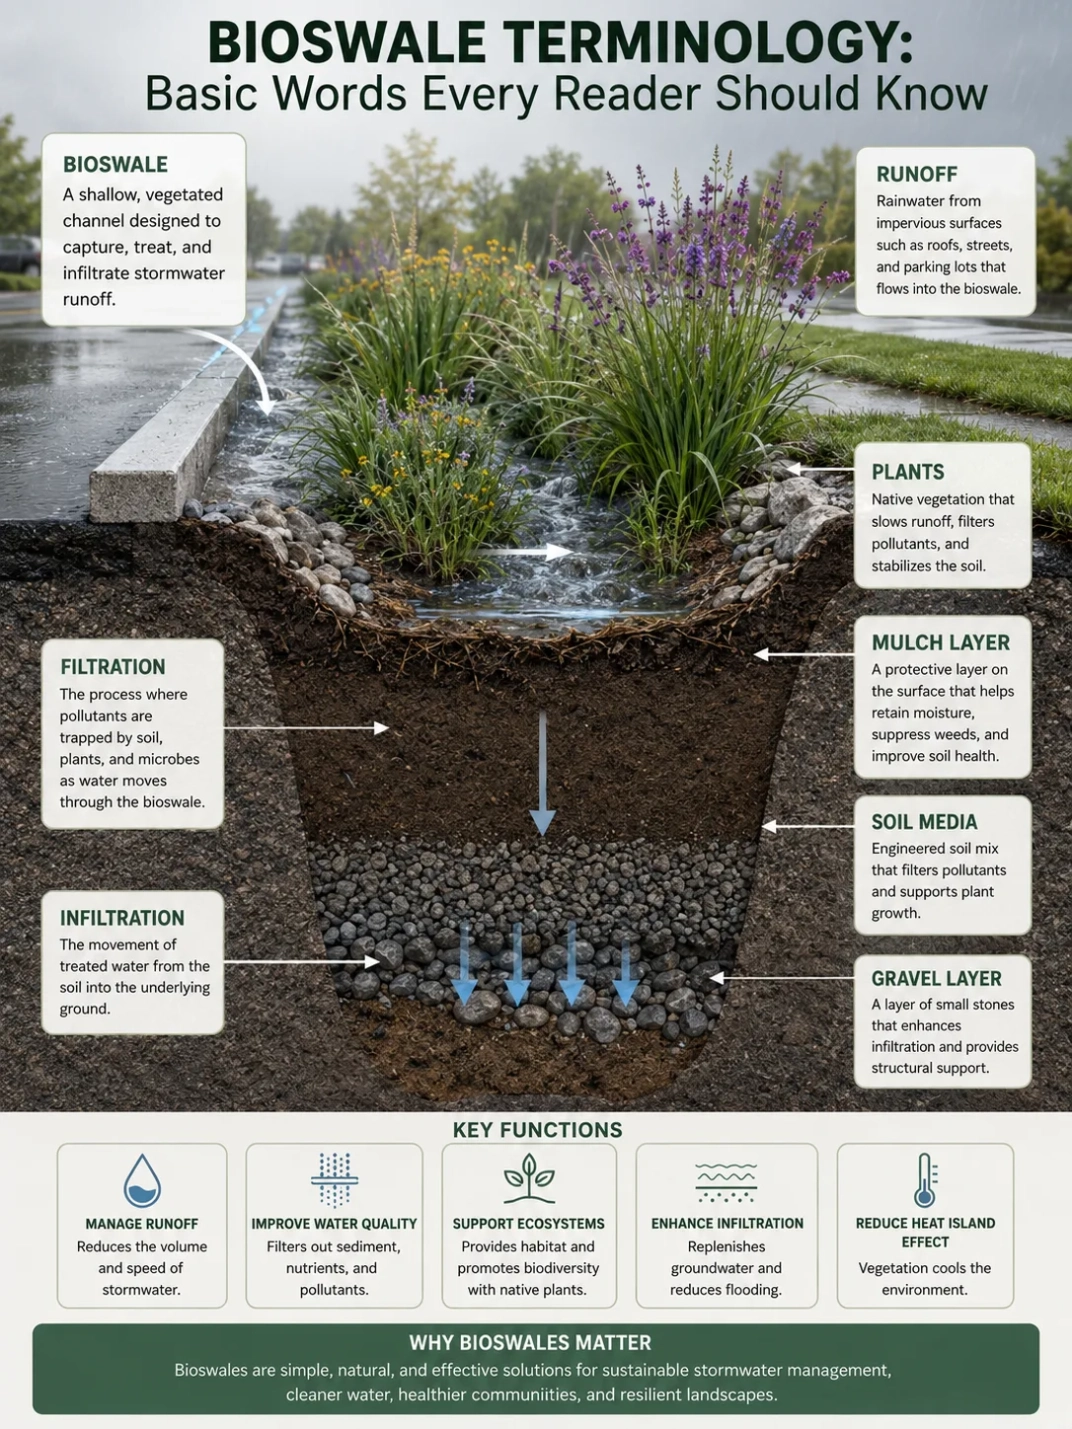
The Basic Parts Shown in a Bioswale Diagram
A beginner-friendly bioswale diagram usually includes five main zones: the runoff source, inlet, planted swale channel, soil and drainage layers, and overflow or outlet. Each part has a job.
Runoff Source
The runoff source is the hard or compacted surface that sheds rainwater. It may be a roof, driveway, sidewalk, road edge, parking lot, patio, or paved courtyard. In a diagram, this area is often shown higher than the bioswale so water can move by gravity.
Impervious surface is a useful term here. It means water does not easily soak in, so rain turns into surface runoff and moves toward a lower point.
Inlet
The inlet is where water enters the bioswale. It may be a curb cut, pipe opening, downspout extension, shallow channel, or graded edge. A well-drawn diagram often shows some form of inlet protection, because fast water can erode soil or carry sediment into the swale.
The inlet should spread water into the swale rather than blast it into one small spot. In many designs, stone, a splash pad, dense grasses, or a widened entry area can help reduce erosion.
Swale Bottom
The swale bottom is the low, gently shaped area where water can slow and spread. It is not meant to act like a permanent pond. In many bioswale designs, water may collect briefly after rainfall, then soak into the soil, move through filter media, or drain toward an outlet.
If a diagram shows a flat or gently graded bottom, that usually means the design is trying to increase contact time between runoff, vegetation, mulch, and soil. More contact can support sediment settling and pollutant filtering when the system is built and maintained well.
Side Slopes
Side slopes are the angled banks along the edges of the bioswale. They guide water into the channel and help connect the swale to nearby ground. Gentle slopes are easier to plant, inspect, and maintain than steep banks.
On a diagram, side slopes may look like simple lines, but they matter. Steeper sides can be harder to stabilize, especially where water enters quickly or where foot traffic compacts the soil.
Plants
Plants are not just decoration in a bioswale diagram. Their stems slow shallow flow, their roots help hold soil, and their growth can support the soil structure needed for infiltration. Plant choice depends on sun, climate, soil moisture, salt exposure, maintenance level, and local suitability.
Many bioswale diagrams show grasses, sedges, rushes, shrubs, or native plants. The best mix often includes plants that can handle both wet periods and dry periods, because a bioswale may be saturated after storms and dry between them.
Mulch or Surface Cover
Some diagrams show mulch, stone, dense vegetation, or another surface layer. This layer can protect soil from erosion, reduce weed pressure, and help keep the surface from sealing over. Organic mulch may not fit every high-flow or roadside setting, so the surface treatment should match the site.
Soil Media
The soil media is the engineered or amended soil layer that supports filtering, plant roots, and drainage. In a simple diagram, it may be shown as one labeled layer under the plants. In a more detailed diagram, it may sit above a drainage aggregate layer or underdrain.
Soil Note: A bioswale does not work well just because it is planted. Soil compaction, poor infiltration, fine sediment buildup, or unsuitable media can reduce performance. Soil conditions should be checked before design decisions are made.
Underdrain
An underdrain is a perforated pipe placed below the soil media in some bioswale designs. It helps collect water that has moved through the soil and carry it to a suitable outlet. Not every bioswale has one.
Underdrains are often considered where native soil drains slowly, where the swale must empty within a desired period, or where the project needs more predictable drainage. A diagram may show the underdrain inside a stone layer, wrapped or separated from the soil media depending on the design.
Outlet and Overflow Route
The outlet is where treated or excess water leaves the bioswale. The overflow route is the path water follows when the swale receives more runoff than it can hold or infiltrate. This is one of the most important parts of any diagram.
A bioswale should have a safe way to pass extra water. That route may lead to a storm drain, another drainage feature, a lower landscape area, or an approved discharge point, depending on the site and local rules.
Site Planning Note: A diagram that does not show an overflow path is incomplete for real planning. Even small residential bioswales need a clear answer for where water goes during larger storms.
A Simple Text Diagram of a Bioswale
The layout below shows the basic idea in a simplified cross-section. It is not a construction plan, but it helps explain how the parts relate to each other.
Runoff from roof, driveway, road, or parking area
        ↓
Inlet or curb opening
        ↓
Vegetated swale bottom with temporary shallow ponding
        ↓
Mulch or protected soil surface
        ↓
Soil media / filter media
        ↓
Native soil infiltration or drainage aggregate
        ↓
Optional underdrain
        ↓
Outlet or safe overflow route
In a top-view diagram, the same system may look like a long planted strip with arrows moving lengthwise. In a side-section diagram, it looks like a shallow bowl with soil layers underneath.
What the Arrows Mean
Arrows in a bioswale diagram usually show flow direction. They may show surface flow across the swale, vertical movement into soil, or overflow movement during a larger storm.
Surface Flow
Surface flow is water moving along the top of the swale. The goal is usually to keep this flow shallow and slow. Vegetation, check dams, roughness, and gentle grades can all help, depending on the design.
Infiltration
Infiltration means water moves down into the soil. This can reduce runoff volume where soil conditions allow it. In compacted or clay-heavy soil, infiltration may be slower, and the design may need amended soil, an underdrain, or another drainage approach.
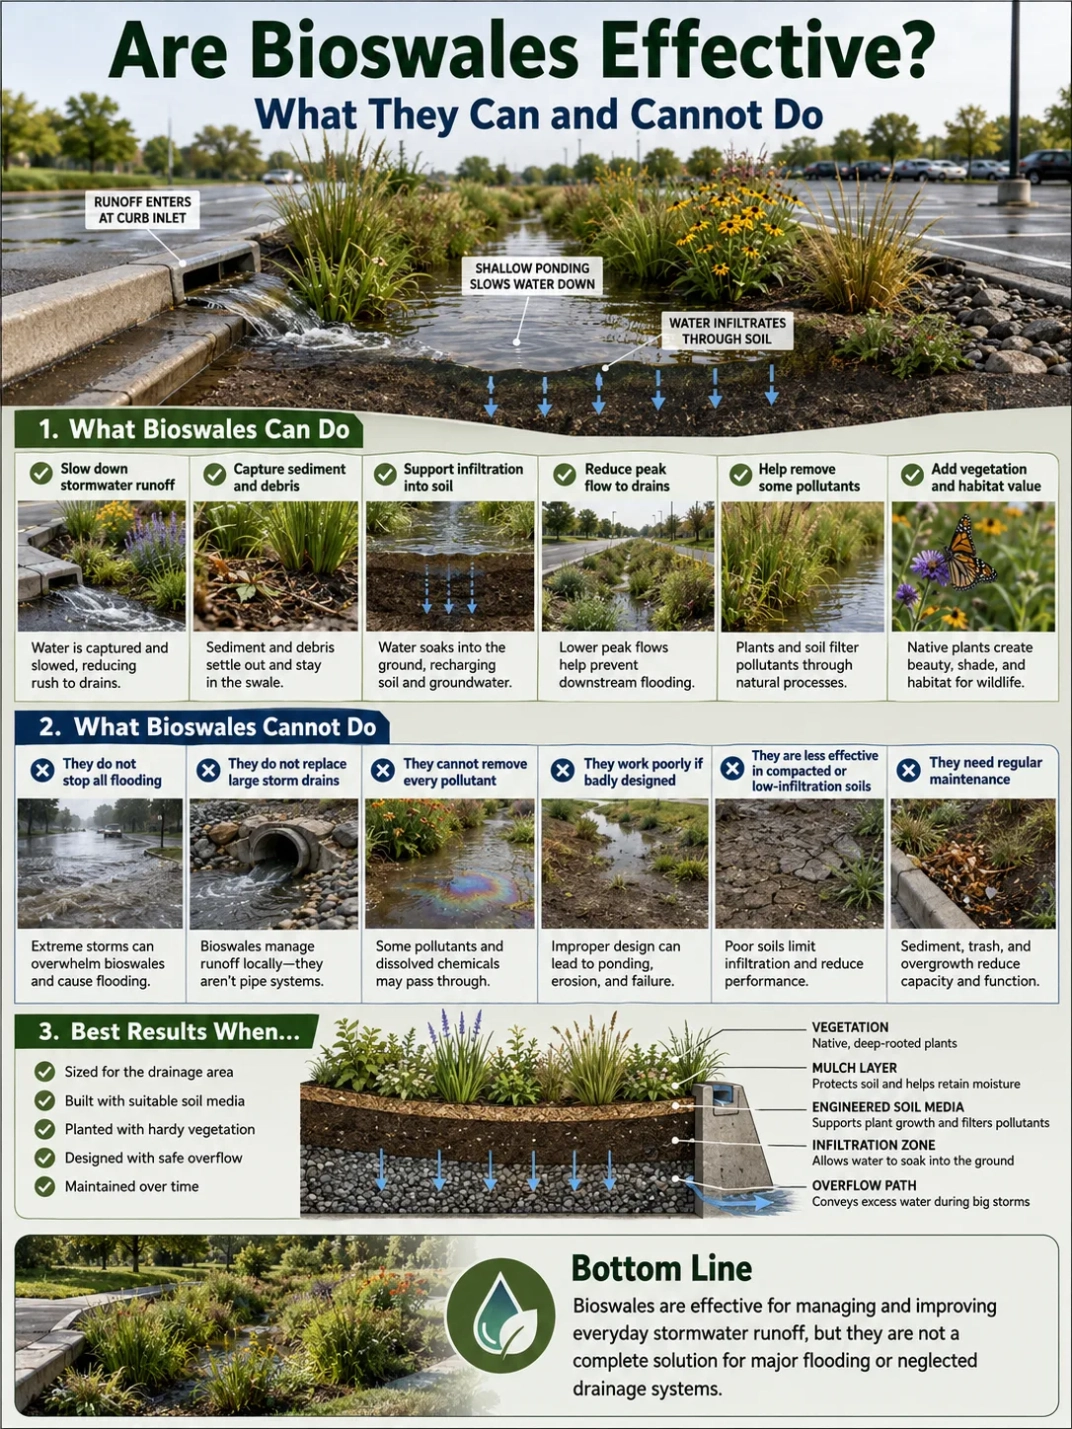
Overflow
Overflow is not a failure by itself. It is part of responsible drainage planning. A bioswale is not expected to absorb every storm. During larger rainfall events, extra water needs a route that does not damage the swale, nearby structures, or neighboring areas.
Beginner Labels Often Seen on Bioswale Diagrams
Some labels appear again and again in bioswale drawings. Understanding them makes the diagram much easier to read.
| Label | Plain Meaning | Why It Matters |
|---|---|---|
| Ponding Depth | The temporary water depth above the swale bottom after rainfall. | Shows how much water may collect before it drains or overflows. |
| Flow Path | The route water follows through the bioswale. | Helps show whether water spreads out or cuts through one narrow channel. |
| Longitudinal Slope | The slope along the length of the swale. | Affects water speed, erosion risk, and the need for check dams. |
| Side Slope | The angled bank from the upper edge down to the swale bottom. | Affects stability, planting, access, and maintenance. |
| Check Dam | A small raised feature that slows water along the swale. | Can help reduce flow speed and create short ponding areas on sloped sites. |
| Underdrain | A perforated pipe below the soil layer. | Helps drain water where infiltration alone may not be enough. |
| Overflow | The planned exit route for excess stormwater. | Prevents water from backing up into unsuitable areas. |
How a Bioswale Diagram Differs from a Rain Garden Diagram
A bioswale diagram often shows linear flow. Water enters at one end or along one edge, moves through a shallow planted channel, and exits or infiltrates along the way. A rain garden diagram often shows a more basin-like feature where runoff collects in a planted depression.
The two systems can overlap in real projects. Both may use plants, soil media, temporary ponding, and infiltration. The difference is usually shape and flow behavior: a bioswale tends to guide water along a path, while a rain garden tends to hold water in a planted basin.
Design Note: Some project drawings use terms loosely. A planted drainage swale, bioswale, and bioretention swale may look similar in diagrams, but their soil profile, storage, underdrain, and treatment goals can differ.
Where the Diagram Can Mislead Beginners
A neat drawing can make a bioswale look simpler than it is. The most common misunderstanding is that any shallow planted channel will work as a bioswale. The diagram should also answer drainage and maintenance questions.
It May Hide Soil Problems
Diagrams often show clean layers, but real soil may be compacted, clayey, sandy, rocky, contaminated by sediment, or disturbed by construction. Soil texture and compaction can shape how water enters, filters, and drains.
It May Make Plants Look Interchangeable
Plant icons are often generic. In real conditions, plant selection should match moisture zones. The bottom of a bioswale may need plants that tolerate short wet periods, while the upper edge may need plants that handle drier soil.
It May Not Show Sediment Load
Runoff from roads, driveways, and parking areas can carry sediment. If sediment builds up near the inlet, it can clog the surface and reduce infiltration. A diagram that includes a forebay, stone apron, or inlet protection is often showing a way to manage that first flush of material.
It May Skip Maintenance Access
A bioswale needs inspection. Inlets, outlets, vegetation, mulch, erosion areas, and sediment zones should be reachable. A beautiful diagram is less useful if it does not show how the system can be checked and kept clear.
What a Good Beginner Diagram Should Include
A useful beginner diagram does not need to show every engineering detail. It should show enough information to explain how the system functions.
- Runoff source: roof, driveway, sidewalk, road, parking lot, or other hard surface.
- Inlet: the place where runoff enters the bioswale.
- Flow direction: arrows showing how water moves across or along the swale.
- Vegetated area: grasses, sedges, rushes, shrubs, or other suitable planting.
- Soil media: the layer that supports filtering and plant roots.
- Temporary ponding area: the shallow space where water may collect after rain.
- Overflow route: the safe path for extra water during larger storms.
- Optional underdrain: a subsurface pipe used where the design needs it.
If those parts are missing, the drawing may still be useful as a concept sketch, but it should not be treated as a full design.
How the System Handles Runoff
A bioswale diagram usually describes a sequence. Rain falls on a hard surface. Water runs off. The inlet guides that water into a shallow planted channel. The swale slows the water, lets sediment settle, and allows some water to filter through the soil.
Where infiltration is suitable, part of the runoff can soak into the ground. Where an underdrain is included, filtered water may move into a pipe and leave the system. During larger storms, extra water follows the overflow route.
This is why the diagram should show both normal flow and overflow flow. The first explains treatment. The second explains safety and drainage behavior.
Plant Zones in a Bioswale Diagram
Planting in a bioswale is shaped by moisture. The bottom, side slopes, and upper edge may face different conditions even within the same small feature.
| Zone | Common Conditions | Planting Role |
|---|---|---|
| Swale Bottom | Wet after storms, dry between storms in many sites. | Needs plants that can tolerate short wet periods and help slow flow. |
| Side Slope | Less ponding, possible erosion pressure during runoff. | Needs roots that help hold soil and cover bare areas. |
| Upper Edge | Drier, more like nearby landscape soil. | Can support plants suited to the surrounding site conditions. |
Planting Note: A bioswale planting plan should avoid treating the whole swale as one uniform bed. Moisture, salt exposure, sun, shade, soil texture, and maintenance access can change plant suitability.
Reading the Soil and Drainage Layers
The soil section of a bioswale diagram can look technical, but the beginner idea is simple: water should pass through a surface that can filter, support roots, and drain at a rate suited to the site.
Some diagrams show only native soil. Others show amended soil, filter media, drainage aggregate, geotextile separation, or an underdrain. These parts should not be copied from one site to another without checking local soil and drainage needs.
When Native Soil May Be Enough
Native soil may support infiltration where it drains well, is not heavily compacted, and can support healthy vegetation. Even then, the design still needs a safe overflow route.
When Soil Media May Be Needed
Soil media may be used when the design needs better filtering, root support, or drainage behavior than the existing soil can provide. The exact mix should match the project goals and local requirements, not a generic recipe.
When an Underdrain May Appear
An underdrain may appear in diagrams for sites with slower-draining soils, limited space, or a need to move filtered water to a defined outlet. It is not a sign that the bioswale has failed. It is a design choice used where conditions call for it.
Common Mistakes a Diagram Can Help Prevent
A clear bioswale diagram can help beginners spot problems before they happen. It shows whether water has a defined entrance, enough room to spread, and a safe exit.
- Sending too much water into too small a swale: The diagram should show the runoff area and flow path, not just the planted strip.
- Forgetting the overflow route: Extra water needs a planned path during larger storms.
- Placing plants without moisture zones: Bottom plants and edge plants may need different tolerances.
- Ignoring sediment near the inlet: Sediment can build up where runoff first enters.
- Assuming soil drains well: Compacted soil can slow infiltration even when the surface looks open.
- Making the swale hard to inspect: Maintenance access should be part of the layout.
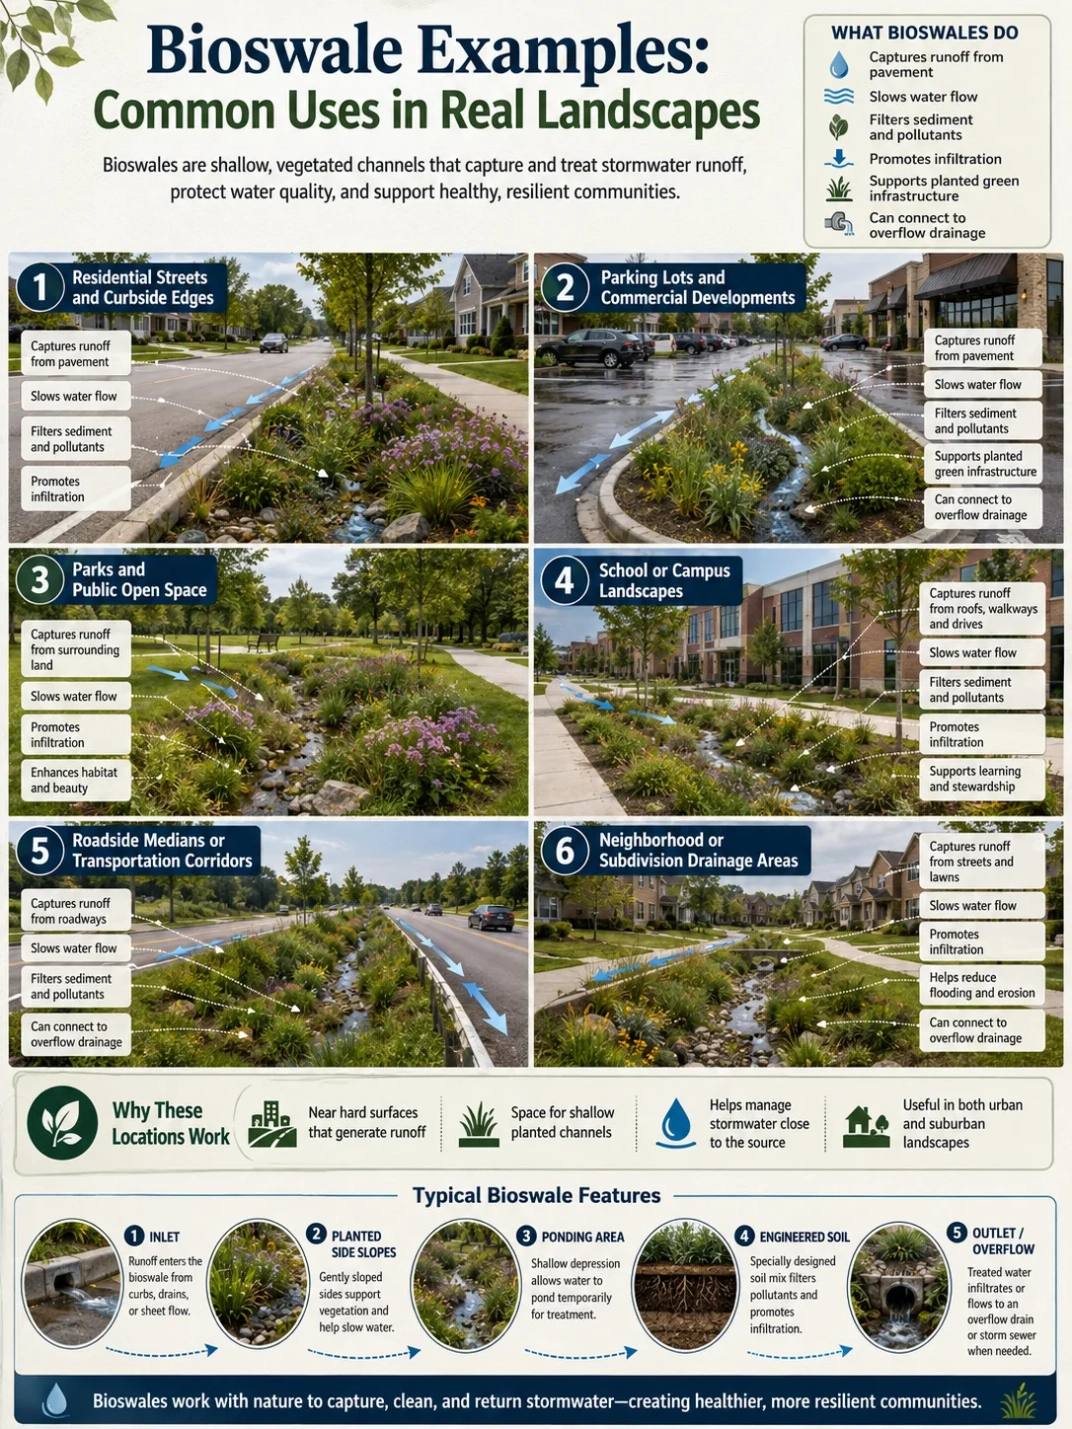
Residential and Public-Space Diagrams
A residential bioswale diagram often shows roof runoff, driveway runoff, yard slope, planting zones, and a safe overflow route away from foundations and neighboring areas. It may be small, but the drainage logic still matters.
A public-space or parking lot bioswale diagram often shows curb cuts, hardscape runoff, sediment control, maintenance access, pedestrian edges, and outlets. These designs may need professional review because runoff volume, traffic areas, public safety, and local drainage rules can shape the final layout.
Maintenance Note: A bioswale diagram should make inspection points easy to understand. Inlets, outlets, overflow areas, bare soil, sediment buildup, and stressed plants are the places people usually need to check first.
What to Check Before Using a Diagram for Planning
A beginner diagram is useful for learning, but it should not replace site review. Before a bioswale concept becomes a real project, several site conditions need attention.
- Where the runoff comes from and how much area drains to the swale.
- Whether the ground slopes toward a safe location.
- How the existing soil drains after rainfall.
- Whether water could affect foundations, basements, paths, or neighboring land.
- Where overflow can go during larger storms.
- Whether local rules, permits, or utility checks apply.
- How sediment, leaves, trash, weeds, and plant replacement will be managed.
For small landscape concepts, a simple diagram can explain the idea. For drainage near structures, public areas, roads, steep slopes, or large paved surfaces, professional review may be needed.
FAQ
What does a bioswale diagram show?
A bioswale diagram shows how stormwater enters a planted swale, moves through vegetation and soil, and leaves through infiltration, an outlet, or an overflow route. It may also show soil media, side slopes, plants, check dams, ponding depth, and an underdrain.
Why are arrows important in a bioswale diagram?
Arrows show the direction of water movement. They help explain where runoff enters, how it flows through the swale, where it may soak into the soil, and where extra water goes during larger storms.
Does every bioswale diagram need an underdrain?
No. Some bioswales rely mainly on infiltration into suitable soil. Others include an underdrain when soil drains slowly or when the design needs a defined drainage outlet. The need depends on site conditions and project goals.
Is a bioswale diagram the same as a rain garden diagram?
No. A bioswale diagram usually shows a longer planted channel that guides water along a flow path. A rain garden diagram usually shows a planted basin that holds runoff in one area. The two can share similar soil and planting ideas.
What is the most important part of a beginner bioswale diagram?
The most important part is the water path. A useful diagram should show where runoff comes from, how it enters the swale, how it slows and filters, and where overflow goes when the swale receives more water than it can handle.
Can a simple bioswale diagram be used as a construction plan?
A simple diagram can explain the concept, but it should not be treated as a full construction plan. Real projects may need soil review, drainage sizing, local code checks, utility checks, and professional input, especially near buildings or public hardscape areas.