A bioswale design works best when four parts are planned together: slope, soil, plants, and drainage. The swale must move stormwater slowly enough for filtering and infiltration, but not so slowly that water sits for too long, erodes the channel, or clogs the soil surface with sediment.
A bioswale is not just a planted ditch. It is a shaped, vegetated stormwater feature that receives runoff from roofs, driveways, parking lots, streets, walkways, or other impervious surfaces. Its job is to slow flow, spread water, trap sediment, support plant roots, and guide excess water safely away.
The exact design depends on local rainfall, soil texture, available space, groundwater, frost depth, plant region, local codes, and the runoff source. A small residential bioswale beside a driveway will not use the same detail as a curbside bioswale handling road runoff. The design logic, however, stays similar.
Design Goal: Controlled Flow, Not Standing Water
The main design question is simple: where does the water enter, how does it move through the swale, and where does extra water go when the swale is full?
A good bioswale has a visible flow path. Water enters through an inlet, spreads through the vegetated channel, passes over soil and roots, and then exits through an outlet, overflow route, underdrain, or connected drainage system where the design allows it.
Design Note: A bioswale should be designed as part of a drainage path, not as an isolated low spot. The overflow route matters as much as the planted channel, especially during larger storms.
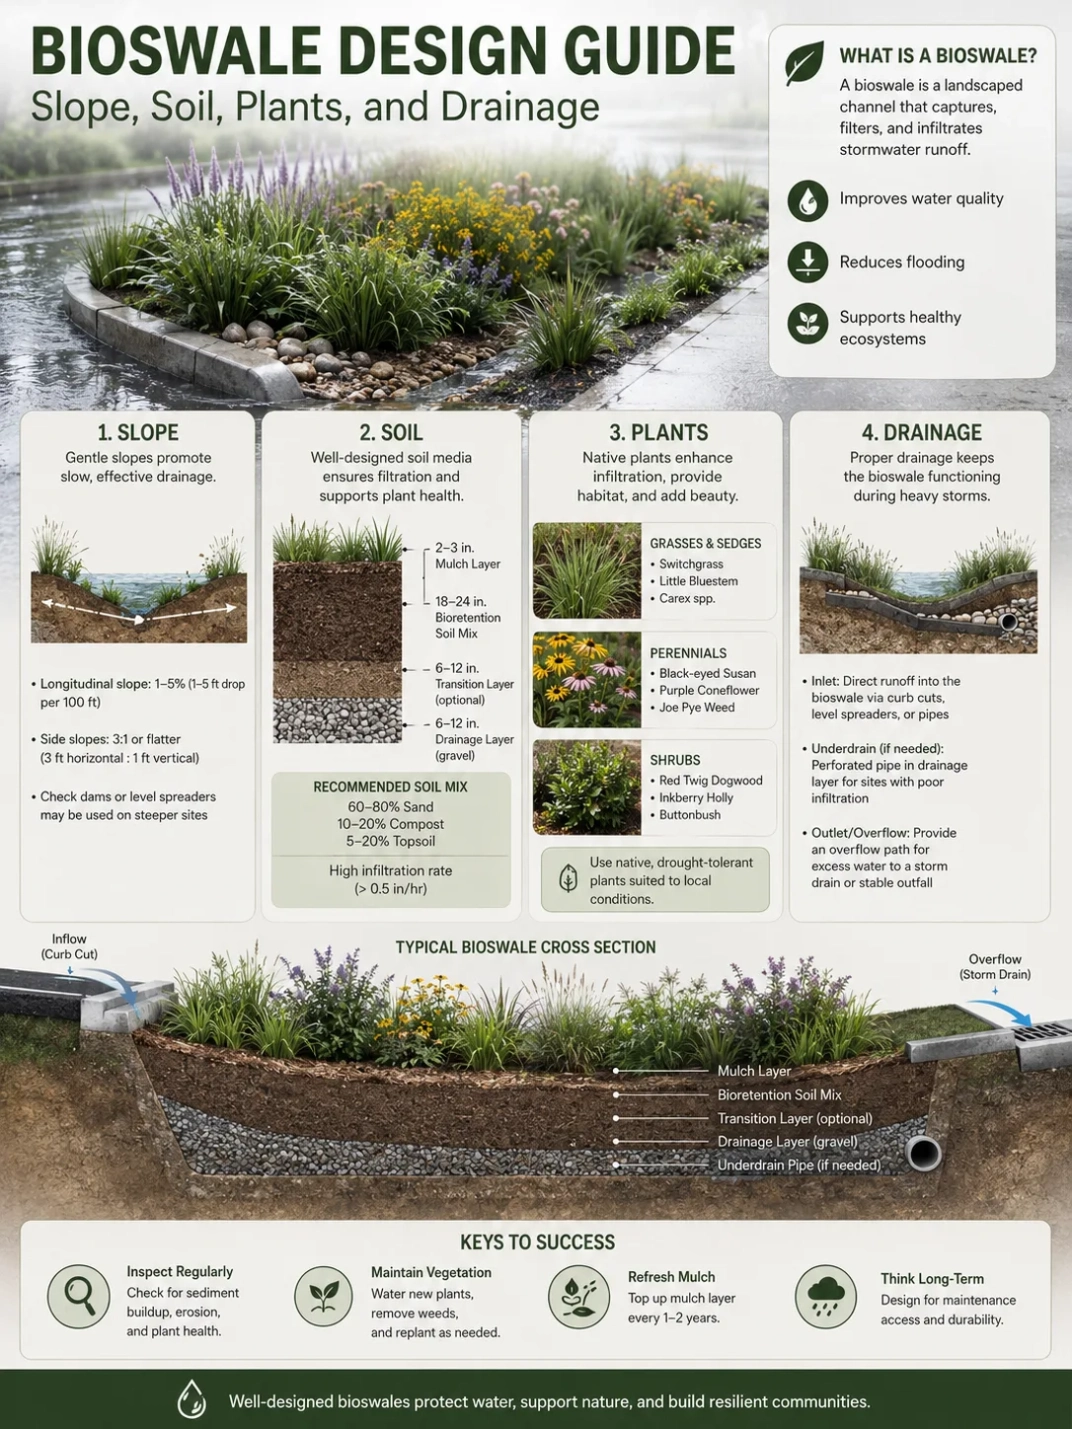
Main Parts of a Bioswale Design
A bioswale can look simple from above, but its performance depends on several connected parts. Each part affects how water slows, filters, infiltrates, or leaves the site.
| Design Element | Purpose | What to Check |
|---|---|---|
| Inlet | Brings runoff into the bioswale from a roof drain, curb cut, driveway edge, parking area, or paved surface. | Water should enter without cutting a rut into the soil or mulch. |
| Longitudinal Slope | Moves water along the swale from the high end toward the low end. | The slope should allow slow movement, not fast channel flow. |
| Side Slopes | Shape the edges of the swale and affect safety, access, mowing, planting, and erosion. | Side slopes should be stable, maintainable, and suitable for the site use. |
| Soil or Filter Media | Supports infiltration, plant roots, and pollutant filtering. | Soil should drain at a rate that fits the project and should not be compacted. |
| Plants | Slow flow, hold soil, take up moisture, shade the surface, and support root channels. | Plants should match wet and dry periods, sunlight, salt exposure, and local climate. |
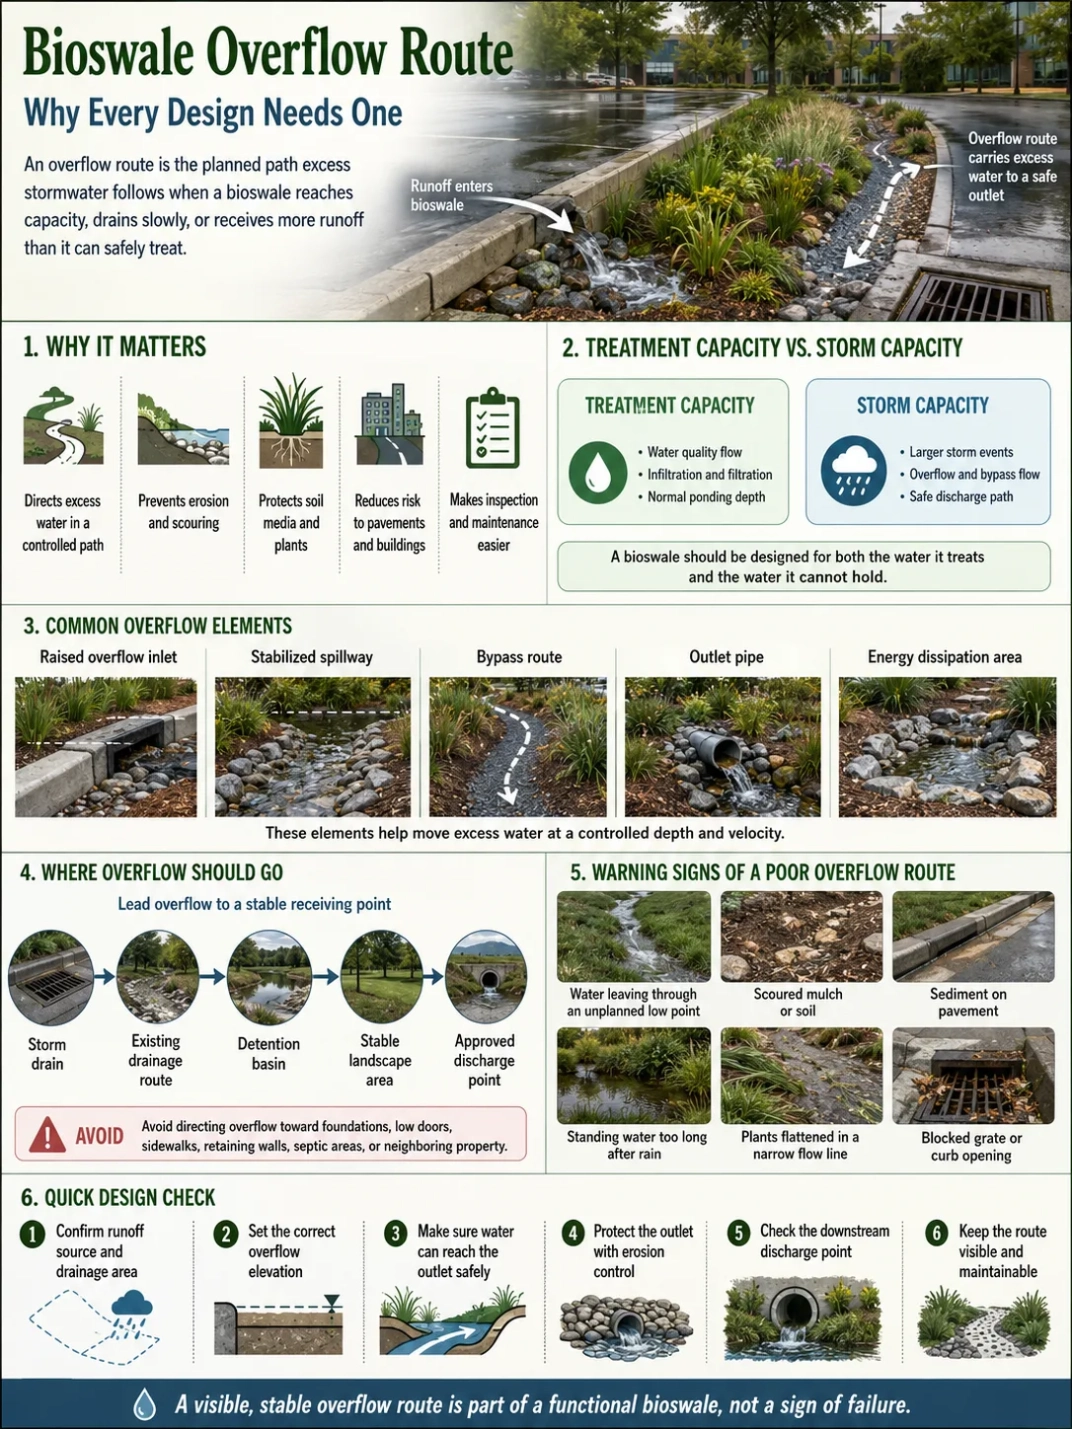
| Overflow Route | Provides a safe path when runoff exceeds the storage and infiltration capacity. | Overflow should not move water toward buildings, unstable slopes, or neighboring property. |
| Underdrain | Moves filtered water out when native soil drains slowly or where full infiltration is not suitable. | Use depends on soil, groundwater, project goals, and local rules. |
Slope: How Grade Shapes Water Movement
Slope is one of the most visible design choices in a bioswale. It controls how quickly stormwater moves through the channel and how much time water has to spread across vegetation and soil.
A bioswale with too much grade can act more like a drainage ditch. Water may rush through, flatten mulch, expose soil, and carry sediment to the outlet. A bioswale with too little grade may pond water in the wrong places, collect fine sediment, or stay wet longer than the planting and soil can support.
Longitudinal Slope
The longitudinal slope is the slope along the length of the swale. It runs from inlet to outlet. This grade should support steady, shallow movement rather than fast, narrow flow.
On steeper sites, designers may use check dams, stone weirs, level spreaders, or terraced segments to slow water and create short storage zones. These features can help break one fast run into several calmer sections.
Site Planning Note: A steep property does not automatically rule out a bioswale, but it changes the design. Grade breaks, erosion control, inlet protection, and overflow planning become more important.
Side Slopes
Side slopes shape the banks of the swale. Gentle side slopes are easier to plant, inspect, and maintain. They also reduce the chance that bare soil will slump into the channel.
In public or commercial spaces, side slopes may need extra review for pedestrian safety, mower access, visibility, and edge treatment. In residential yards, side slopes should be stable enough to avoid a sharp trench appearance and shallow enough for routine care.
Check Dams and Flow Spreaders
Check dams are small raised features placed across the swale. They slow water, reduce erosion, and create short ponding areas. They may be made from stone, timber, concrete, soil, or other approved materials, depending on the project.
They should not block the system in a way that causes water to back up toward buildings or paved surfaces. Each check dam needs a stable spill point, because water will find a path during heavier flow.
Soil: The Hidden Part That Decides Performance
Soil is where many bioswale designs succeed or fail. The surface may look green and tidy, but the system depends on what happens below the mulch and roots.
A useful bioswale soil layer must do several jobs at once. It should allow infiltration where infiltration is intended, hold enough moisture for plants, resist surface sealing, support root growth, and filter sediment and some pollutants from runoff.
Native Soil and Amended Soil
Some sites have native soil that can support a bioswale with limited amendment. Other sites have clayey, compacted, contaminated, filled, or construction-disturbed soil that drains poorly or unevenly.
Compacted soil deserves special attention. Heavy equipment, foot traffic, or repeated parking can close pore spaces in soil. Once that happens, water may spread across the surface instead of moving downward. Plant roots also struggle in dense soil.
Soil Note: A bioswale should not be planned from surface appearance alone. Soil texture, compaction, seasonal wetness, groundwater depth, and existing drainage patterns all affect the design.
Filter Media
Some bioswales use engineered soil or filter media. This material may include a blend of sand, compost, and soil components, but there is no single mix that fits every site. A mix that drains well in one climate or code area may be unsuitable in another.
Filter media should be selected for the desired water movement, plant needs, and maintenance expectations. Too fine a mix may clog. Too coarse a mix may dry quickly or provide limited plant support. Organic content can help plant growth, but it must be used carefully where nutrient export is a concern.
Clay Soil and Slow Infiltration
Clay soil can still be part of a bioswale project, but it changes the goal. In some clay sites, the swale may mainly slow, filter, and convey runoff rather than fully infiltrate it. An underdrain, amended media, or lined section may be considered where local rules and site conditions allow.
It is not safe to assume that digging a shallow channel into clay will solve drainage problems. Clay can hold water, seal at the surface, and create long wet periods for plants that are not adapted to them.
Drainage: Inlets, Outlets, Overflow, and Underdrains
Drainage design gives the bioswale a controlled beginning and end. Without it, runoff may enter too fast, leave too fast, or escape in the wrong direction.
Inlet Behavior
The inlet is often the most abused part of a bioswale. It may receive roof runoff from a downspout, sheet flow from a driveway, concentrated flow from a curb cut, or sediment-heavy runoff from a parking lot.
Concentrated flow should usually be spread or slowed before it reaches bare soil. Stone aprons, splash pads, forebays, level spreaders, or dense vegetation can help protect the inlet area. The right choice depends on flow volume and site layout.
Outlet and Overflow Route
Every bioswale needs a planned route for water that cannot infiltrate or be stored. This may be a surface outlet, overflow structure, curb opening, catch basin, downstream swale, or other approved discharge point.
The overflow route should be visible in the design. It should direct water away from foundations, basements, retaining walls, septic areas, unstable slopes, and neighboring property. In public spaces, it should also avoid creating slippery or unexpected flow paths across walkways.
Underdrains
An underdrain is a perforated pipe placed below the soil or filter media to collect and move water away after it passes through the swale profile. It is often considered where native soil drains slowly, where groundwater limits infiltration, or where the project must connect to a storm drain system.
Not every bioswale needs one. A swale designed for infiltration in suitable soil may work without an underdrain. A swale in compacted urban fill, tight clay, or a constrained public site may need a different approach.
Drainage Note: The underdrain should not be treated as a shortcut around poor design. Inlet protection, soil media, plant health, overflow routing, and maintenance access still matter.
Plants: Roots, Roughness, and Site Fit
Plants do more than decorate a bioswale. Stems and leaves slow shallow flow. Roots help hold soil, open small pathways, support soil life, and make the surface less prone to erosion.
The best plant choices depend on the swale zone. The bottom of the swale may experience short wet periods after storms. The upper side slopes may dry faster. The inlet may receive sediment and salt. The outlet may see stronger flow.
Moisture Zones
A bioswale usually has at least three planting zones:
- Bottom zone: Handles the most frequent wetting and may need sedges, rushes, grasses, or perennials that tolerate short ponding and later dry periods.
- Side slope zone: Needs plants that stabilize soil and tolerate drier conditions between storms.
- Upper edge zone: Works as a transition area between the swale and nearby lawn, pavement, planting bed, or public space.
Native plants are often useful because many are adapted to local rainfall patterns, soils, and wildlife interactions. Still, “native” is not enough by itself. A plant must also match sun exposure, moisture range, mature size, salt tolerance, maintenance limits, and local invasive species guidance.
Grasses, Sedges, Rushes, Shrubs, and Perennials
Grasses can slow flow and cover soil well. Sedges and rushes often fit wetter swale bottoms. Shrubs may help where deeper roots and structure are useful, but they need enough space and should not block sight lines or maintenance access.
Dense planting helps reduce weeds and exposed soil. Sparse planting leaves more room for erosion, mulch movement, and sediment crusting.
Planting Note: A bioswale planting plan should include wet and dry tolerance. Many swales are wet for a short time after storms, then dry for days or weeks.
How Slope, Soil, Plants, and Drainage Work Together
The strongest bioswale designs do not treat slope, soil, plants, and drainage as separate checkboxes. Each one changes the others.
Steeper slopes may need denser vegetation, check dams, stronger inlet protection, and erosion-resistant surface treatment. Slow-draining soil may need amended media, an underdrain, or a design that focuses more on filtration and conveyance. Plant choices may change if the swale receives salty road runoff, shaded roof runoff, or sediment-heavy parking lot runoff.
| Site Condition | Design Response | Why It Matters |
|---|---|---|
| Steeper Grade | Use flow breaks, stable inlets, erosion control, and careful overflow planning. | Fast flow can cut channels and move mulch or sediment. |
| Compacted Soil | Test soil, reduce compaction, amend where suitable, or consider underdrain options. | Compaction limits infiltration and root growth. |
| Clay Soil | Plan for slower drainage; use suitable plants and consider filtered conveyance or underdrain designs. | Water may remain near the surface longer than expected. |
| Parking Lot Runoff | Add inlet protection, sediment control, durable plants, and maintenance access. | Runoff may carry more sediment and debris than roof runoff. |
| Small Residential Yard | Keep overflow away from foundations and neighboring lots; match the scale to the drainage area. | Limited space leaves less room for error. |
| Public Walkway Edge | Review side slopes, ponding areas, visibility, and safe overflow paths. | The design must fit both drainage and everyday use. |
Design Sequence for a Real Site
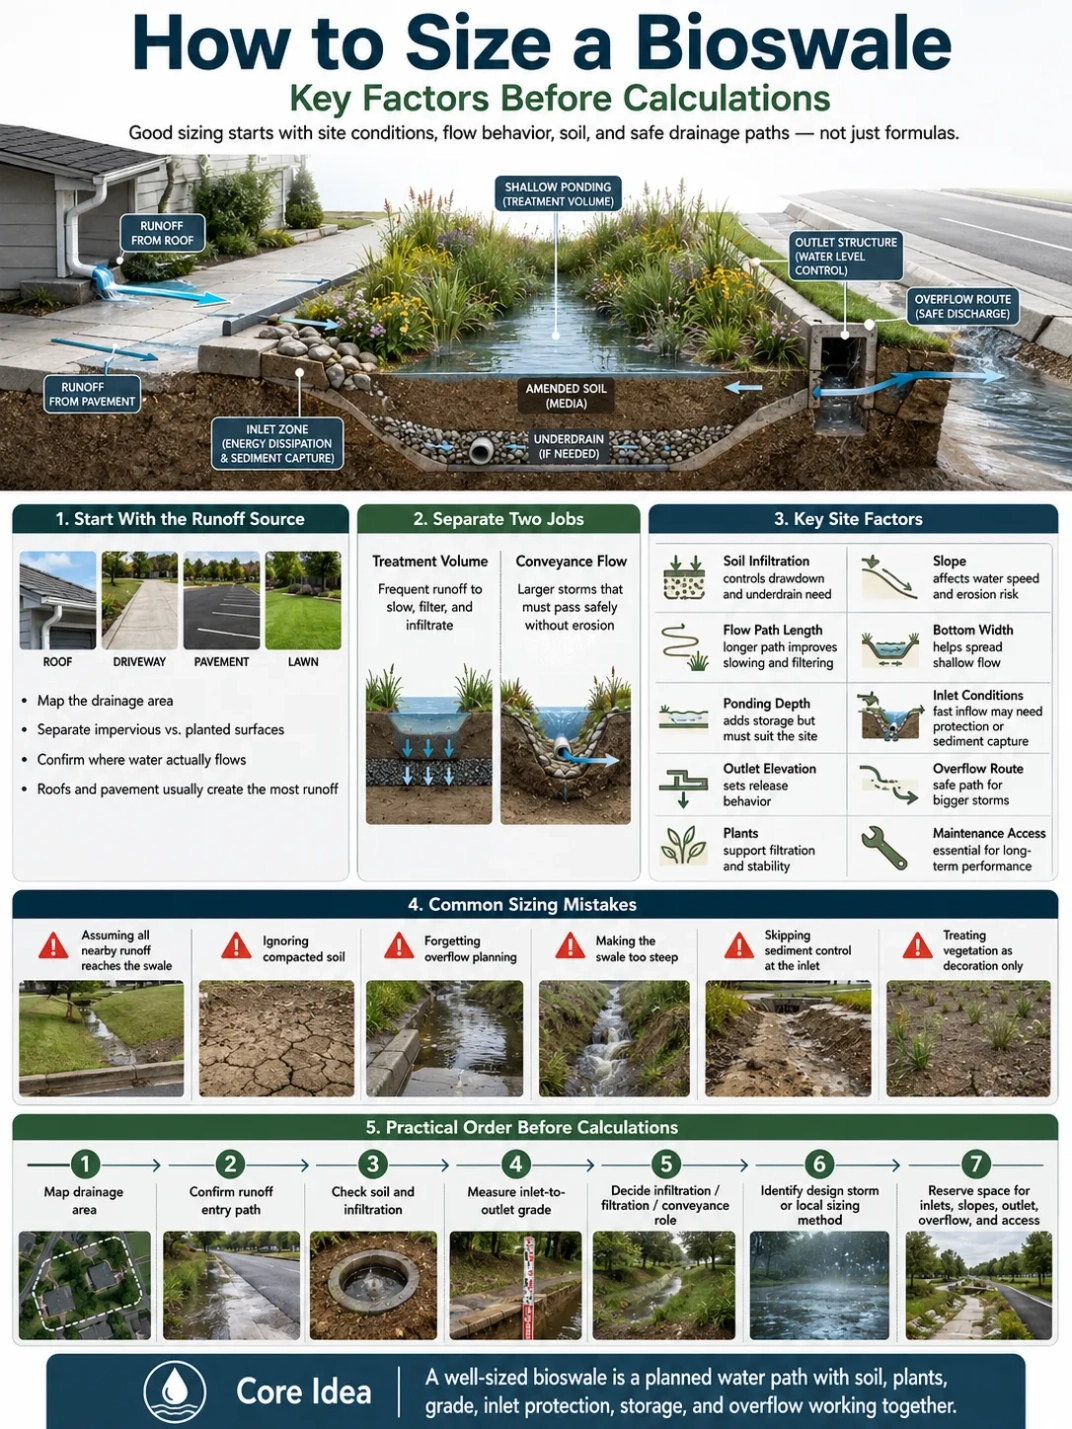
A bioswale design usually begins with water, not plants. The planting plan comes after the runoff source, flow direction, soil, and overflow route are understood.
- Identify the runoff source. Roof runoff, driveway runoff, roadside runoff, and parking lot runoff behave differently.
- Map the flow path. Mark where water enters, where it slows, where it may pond, and where overflow exits.
- Check soil conditions. Look at soil texture, compaction, infiltration, groundwater, and seasonal wetness.
- Set the swale shape. Plan length, width, bottom area, side slopes, and grade based on the drainage area and available space.
- Plan inlet protection. Reduce erosion where water first enters the swale.
- Select plants by zone. Match the bottom, side slopes, and upper edge to wet and dry conditions.
- Confirm overflow safety. Make sure excess water has a planned route.
- Plan maintenance access. The system must be easy to inspect, weed, clear, and repair.
Residential Bioswale Design Details
Residential bioswales often handle roof runoff, driveway runoff, patio runoff, or water moving across a lawn. They are smaller than public stormwater systems, but they still need careful drainage logic.
The most common residential mistake is placing the swale where water has no safe exit. A low planting bed near a downspout may look like a bioswale, but if overflow moves toward a foundation or basement wall, the design is not working as a drainage feature.
Downspouts and Roof Runoff
Roof runoff may enter a bioswale through a downspout extension, splash block, stone apron, or surface channel. The goal is to spread the water before it reaches the soil surface.
Downspout runoff should not be directed into a small swale without an overflow route. During heavy rain, a roof can deliver water faster than a shallow planting area can absorb it.
Driveways and Walkways
Driveway runoff may carry sediment, fine grit, leaves, winter deicing material, or small debris. The inlet edge should be stable and easy to clean. Dense planting can help slow flow, but it should not hide clogging at the entry point.
Site Planning Note: Near buildings, retaining walls, steep slopes, septic systems, or shared property lines, a bioswale layout may need professional review. Local drainage rules may also apply.
Commercial, Roadside, and Public-Space Bioswales
Public and commercial bioswales often receive runoff from larger paved areas. They may be placed along parking lots, medians, sidewalks, campuses, streets, or civic landscapes.
These sites often need stronger inlet protection, clear maintenance access, sediment forebays, curb cuts, safe side slopes, and a defined connection to the larger stormwater system. Design review is often needed because the swale interacts with public movement, utilities, pavement edges, and storm drain infrastructure.
Hardscape Runoff
Hardscape runoff can arrive quickly because pavement does not absorb much water. The more impervious surface draining to the bioswale, the more attention the design must give to entry flow, sediment load, storage, and overflow.
Parking lot and roadway edges may also bring higher sediment loads than roof runoff. A cleanout area near the inlet can make maintenance easier and reduce clogging deeper in the swale.
Common Design Mistakes
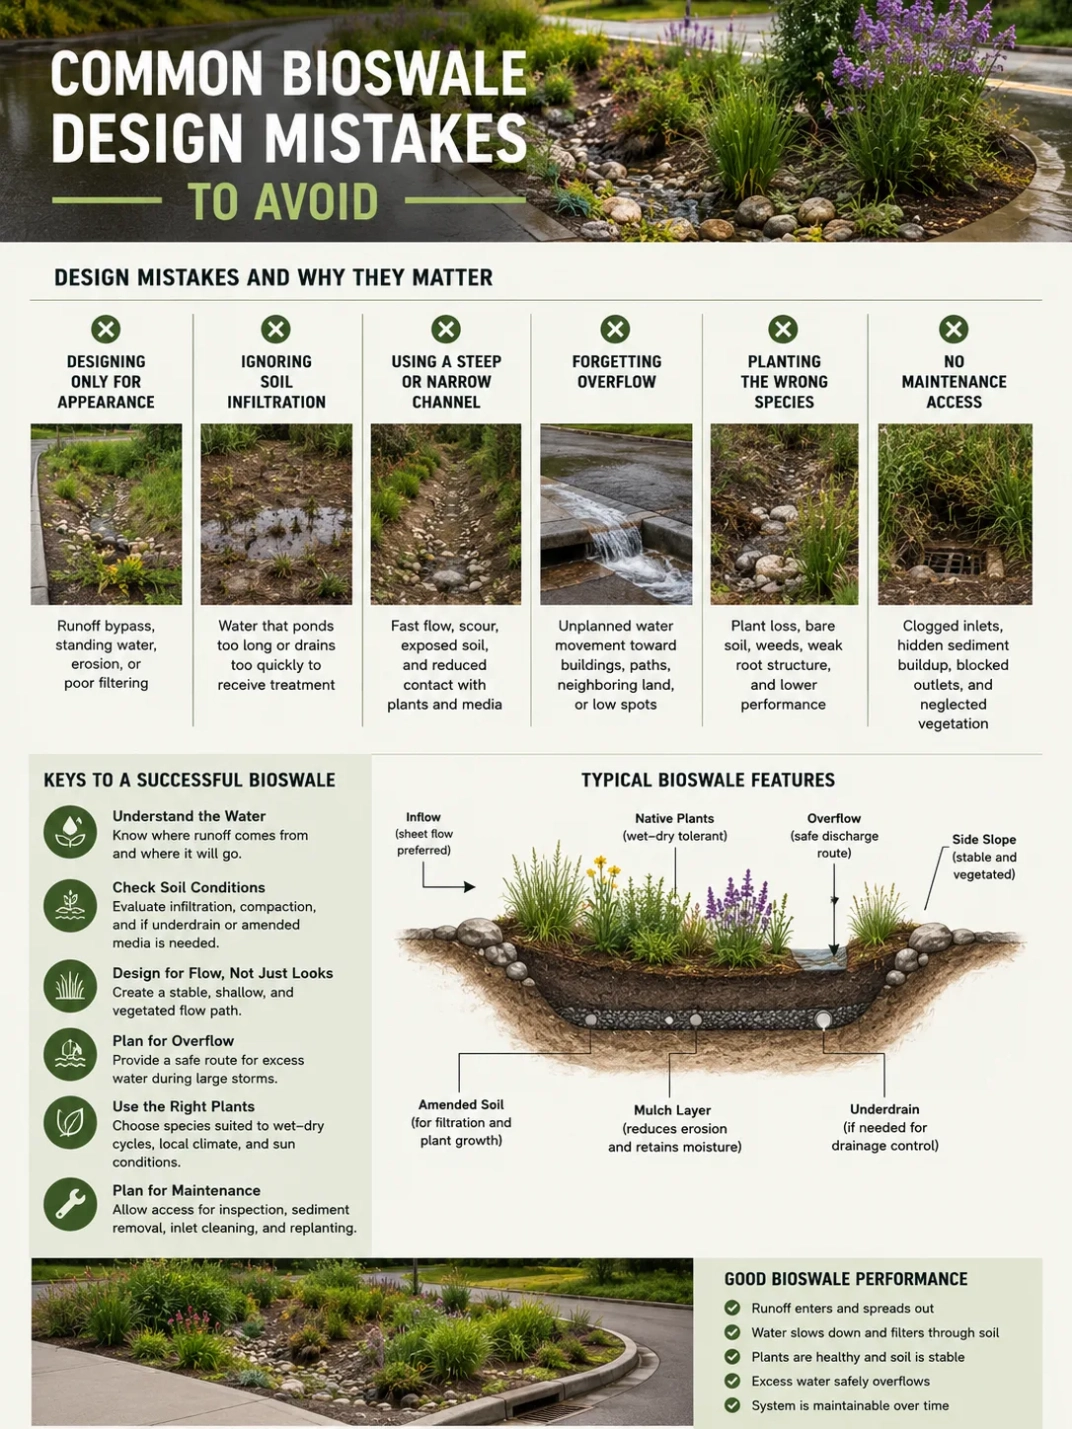
Many bioswale problems start with small layout choices that become larger after repeated storms.
- No clear overflow route: Water leaves the swale in an uncontrolled direction.
- Too much concentrated flow: Runoff enters as a narrow stream and cuts through soil or mulch.
- Compacted soil left in place: Water sits on the surface instead of moving into the soil profile.
- Plants chosen only for appearance: The planting fails because it does not match wet, dry, sun, salt, or sediment conditions.
- Side slopes too steep for maintenance: Weeding, mowing, replanting, and inspection become harder.
- Underdrain used without surface care: The pipe may move water away, but the swale can still clog at the surface.
- Mulch placed where fast water enters: Loose mulch may float or wash out unless the inlet is protected.
Maintenance Access Should Be Designed from the Start
A bioswale is a living drainage system. It needs inspection, especially at the inlet, outlet, overflow route, and planted surface.
Maintenance usually involves removing sediment, clearing leaves and trash, checking for erosion, replacing failed plants, managing weeds, renewing mulch where appropriate, and keeping inlets and outlets open. The work is usually easier when the design includes reachable edges and visible flow points.
Maintenance Note: If water remains longer than expected, if soil develops a sealed crust, or if flow cuts a channel through the swale, the problem is usually physical. More plants alone may not fix it.
How a Bioswale Differs from Nearby Drainage Features
A bioswale overlaps with several stormwater features, but it has its own role. It is mainly a vegetated surface flow system that slows, filters, and may infiltrate runoff while guiding excess water along a planned path.
| Feature | Main Function | How It Differs |
|---|---|---|
| Drainage Ditch | Moves water away from an area. | A ditch may focus on conveyance, while a bioswale also uses vegetation, soil, and slower flow for filtering. |
| Rain Garden | Collects and infiltrates runoff in a planted depression. | A rain garden is often basin-like, while a bioswale is usually longer and shaped for flow along a path. |
| Bioretention Cell | Filters runoff through engineered media and planting. | Bioretention may be more basin-like or engineered, while a bioswale often combines channel flow with filtering. |
| French Drain | Moves subsurface water through gravel and pipe. | A French drain works below the surface; a bioswale uses visible surface flow, vegetation, and soil interaction. |
| Dry Creek Bed | Creates a stone-lined drainage path or landscape feature. | A dry creek bed may move water, but it may not provide the same soil and plant filtering function. |
What to Check Before Planning
Before shaping a bioswale, several site questions should be answered. These checks keep the design grounded in real conditions rather than a generic diagram.
- Where does the runoff come from?
- How much impervious surface drains toward the swale?
- Does water arrive as sheet flow or concentrated flow?
- What is the natural direction of grade?
- Is the soil sandy, loamy, clayey, compacted, or filled?
- Where will excess water go during heavier storms?
- Are there nearby foundations, basements, walls, utilities, septic areas, sidewalks, or property lines?
- Will the swale be easy to inspect after storms?
- Do local rules require review, permits, setbacks, or approved discharge points?
When Professional Review Is Sensible
A small landscape-scale bioswale may be simple, but some situations call for a landscape architect, civil engineer, stormwater designer, soil professional, or local authority review.
Professional review is sensible when the swale receives runoff from a large paved area, sits near a building foundation, connects to a public drainage system, lies on a steep slope, affects a shared boundary, interacts with utilities, or must meet a local stormwater requirement.
This does not make bioswales overly complex. It simply means the design should match the risk and scale of the site.
FAQ
What slope works best for a bioswale?
The best slope depends on soil, runoff volume, site length, vegetation, and local design rules. A bioswale should have enough grade to move water toward an outlet, but not so much that runoff cuts channels through the soil or mulch.
Can a bioswale work in clay soil?
A bioswale can work in some clay sites, but the design may focus more on slowing, filtering, and conveying runoff rather than full infiltration. Clay soil may need amended media, suitable plants, an underdrain, or professional review depending on the site.
Does every bioswale need an underdrain?
No. An underdrain is used when site conditions call for it, such as slow-draining soil, constrained urban areas, or projects that must connect to a storm drain system. In suitable soils, a bioswale may be designed without one.
What plants work best in a bioswale design?
Good bioswale plants tolerate both wet periods after storms and dry periods between storms. Native grasses, sedges, rushes, perennials, and some shrubs may work well when they match the local climate, sunlight, soil, salt exposure, and maintenance plan.
How deep should water pond in a bioswale?
Ponding depth should be based on the design goal, soil drainage, available space, plant tolerance, and local requirements. The design should avoid long unwanted standing water and should include a safe overflow route for larger storms.
When should a bioswale design be reviewed by a professional?
Professional review is wise when runoff comes from a large paved area, the swale is near a foundation or property line, the site has steep slopes or slow-draining soil, or the design must connect to a public stormwater system.