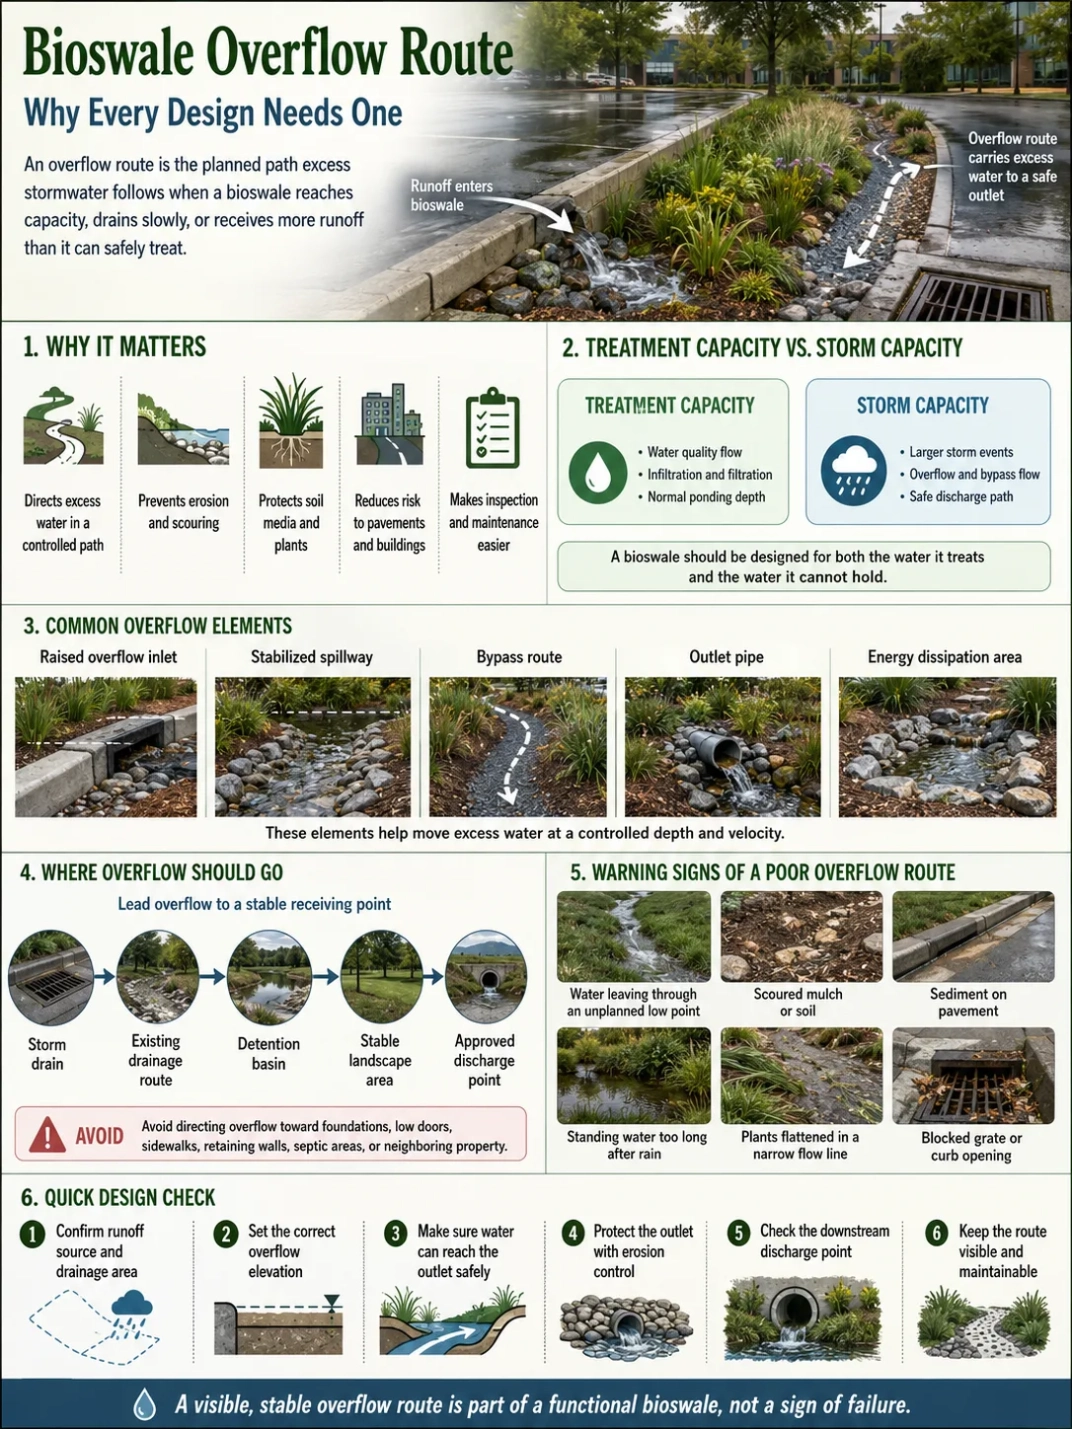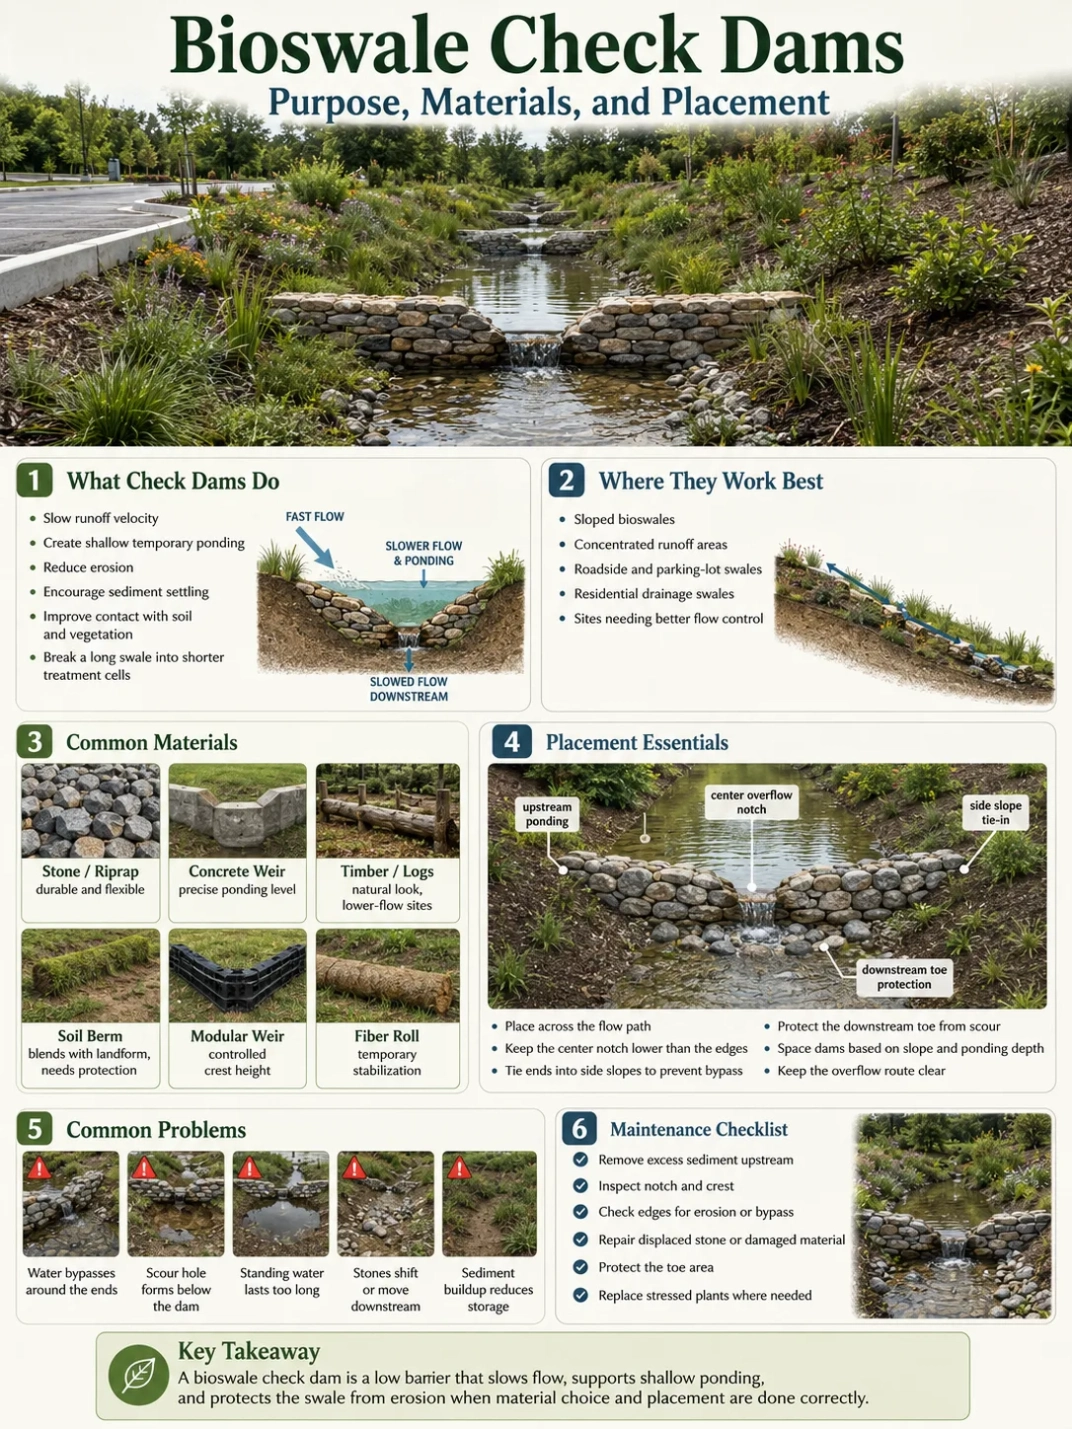
A bioswale check dam is a low barrier placed across the swale to slow runoff, spread water, and create a stepped flow path instead of one fast channel. It does not turn a bioswale into a pond, and it does not solve every drainage problem. Its main job is to help stormwater move through the bioswale at a calmer speed so vegetation, soil media, and the overflow route can work as intended.
Check dams are most useful where a bioswale has a noticeable longitudinal slope, receives concentrated runoff, or needs short sections of temporary ponding to improve water contact with the soil surface. They are common in vegetated swales, bioretention swales, roadside swales, parking lot edge systems, and residential drainage features where water must keep moving without cutting a channel through the planting bed.
Bioswale Check Dams and What They Actually Do
A check dam is a small grade-control element. In a bioswale, it sits across the flow path and creates a modest drop from one swale section to the next. Water backs up slightly behind the dam during runoff events, then passes through, over, or around a designed low point before continuing downstream.
The word dam can be misleading. A bioswale check dam is not meant to hold water permanently. In many designs, water should drain down after the storm through infiltration, underdrain flow, or controlled surface release, depending on the soil and drainage design.
Its purpose is practical: reduce flow energy before it becomes erosion. That calmer flow gives plant stems, mulch, stone, and soil media a better chance to filter sediment and support infiltration.
Main Functions of a Check Dam
- Slow runoff velocity on sloped sections of the bioswale.
- Create shallow temporary ponding so water has more contact time with vegetation and soil.
- Reduce erosion in the swale bottom and along side slopes.
- Encourage sediment settling before fine particles move farther downstream.
- Divide a long swale into shorter cells that behave more like a stepped treatment system.
- Help maintain ponding depth where the swale profile is steeper than ideal for treatment.
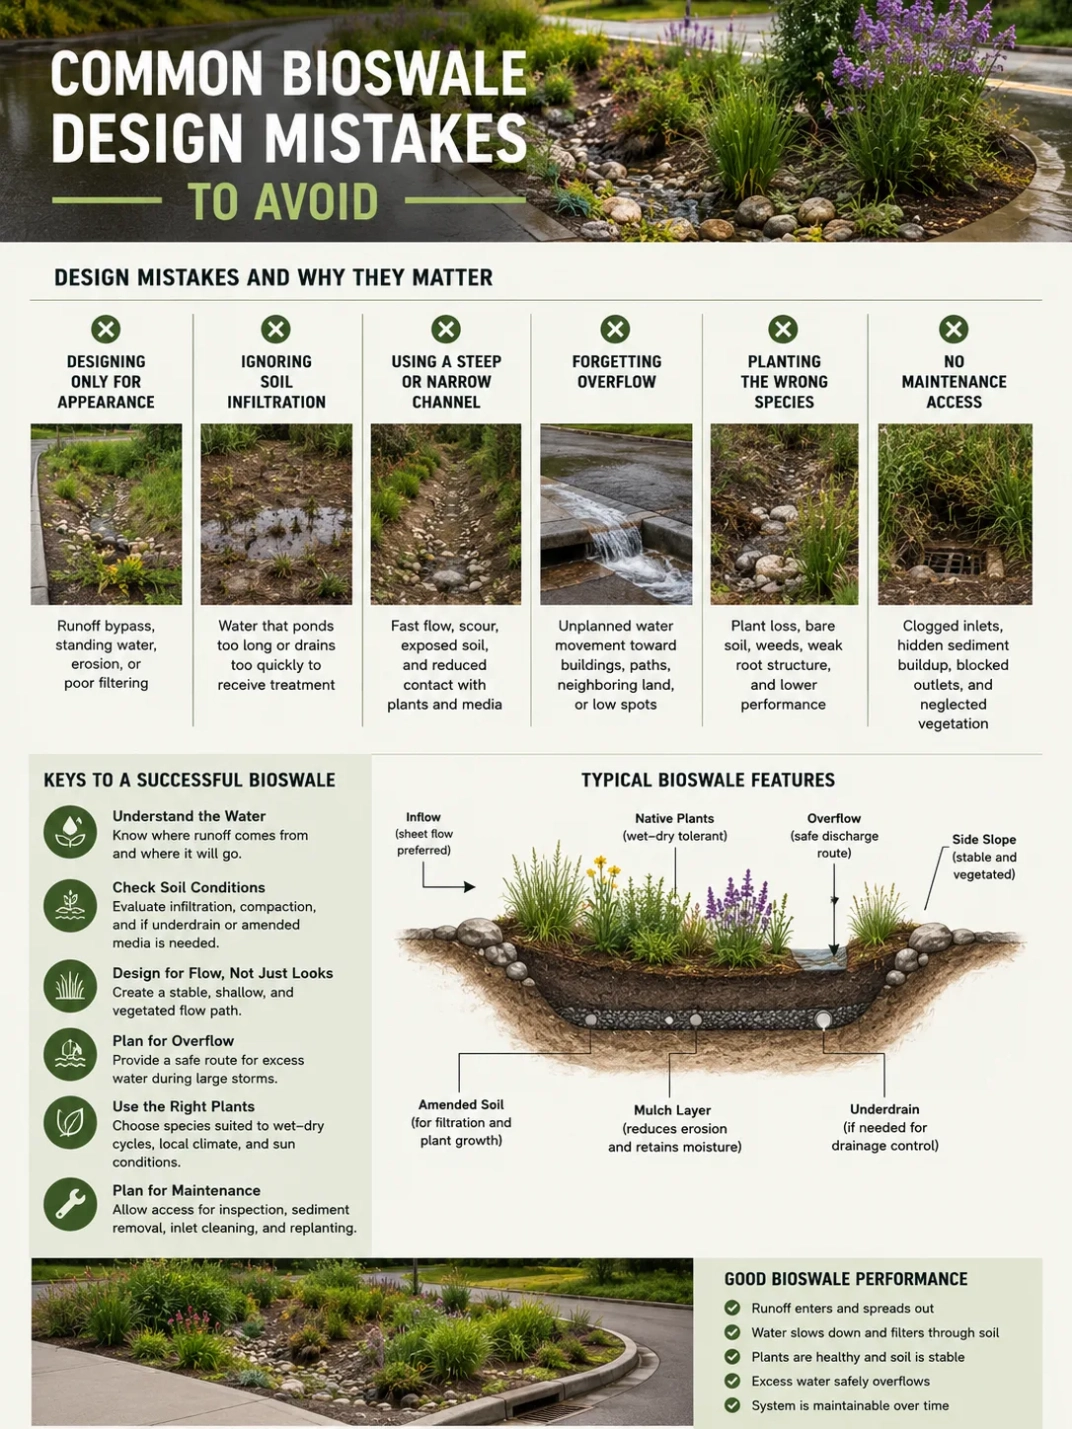
A check dam is not a substitute for correct sizing, stable inlets, adequate outlet capacity, or a safe overflow route. It is one part of the drainage design, not the whole system.
Where Check Dams Fit in a Bioswale
Check dams belong inside the swale flow path, usually perpendicular to the direction of runoff. They are placed where the grade needs to be broken into smaller drops. On a flat bioswale, they may offer little value. On a sloped bioswale, they can help prevent the water from moving too quickly through the planting area.
The best placement depends on the swale length, slope, soil infiltration, expected runoff volume, ponding depth, vegetation density, and outlet design. A small residential swale receiving roof runoff may need a different approach than a public streetscape bioswale receiving curb runoff from pavement.
| Design Need | How a Check Dam Helps | What Still Needs Review |
|---|---|---|
| Steep swale profile | Breaks the slope into shorter, calmer flow sections. | Longitudinal grade, side slope stability, and outlet capacity. |
| Fast surface runoff | Slows water and reduces erosive force in the swale bottom. | Inlet protection, flow spread, and downstream erosion control. |
| Limited contact time | Creates shallow temporary ponding behind the dam. | Drain-down time, soil media, underdrain need, and local rules. |
| Sediment movement | Encourages heavier particles to settle upstream of the dam. | Sediment removal access and clogging risk. |
| Uneven water distribution | Spreads flow across more of the swale width when shaped correctly. | Low-flow notch, dam crest, and outflanking protection. |
The table shows why placement cannot be treated as decoration. A check dam changes the hydraulics of the swale. It affects water depth, sediment storage, plant wetness, maintenance needs, and how overflow behaves during larger storms.
Why Placement Matters More Than Appearance
A check dam that looks neat but sits in the wrong place can make a bioswale perform worse. Water may cut around the ends, scour the downstream toe, drown plants in one zone, or leave other parts of the swale dry. Placement should follow the way water enters, spreads, ponds, and exits the system.
In many bioswales, check dams are spaced so the ponded area behind one dam reaches near the toe of the next upstream dam. This creates a stair-step profile instead of isolated puddles. Exact spacing depends on slope, dam height, swale geometry, and the desired ponding behavior. A single fixed spacing rule does not fit all sites.
The crest of the dam should usually include a controlled low point, notch, or weir-like shape so overflow passes through the center rather than along the edges. This helps protect side slopes from outflanking, which happens when water bypasses the dam and erodes around it.
Design Note: A check dam should guide water through a planned overflow point. If the ends are lower than the center, runoff can escape around the sides and cut into the swale banks. The center is often shaped as the lower point so water stays in the intended flow path.
Good Placement Usually Considers These Details
- Upstream inlet behavior: Water should enter the swale without forming a narrow, erosive jet.
- Flow path length: Check dams should support treatment time, not shorten the path by forcing bypass flow.
- Side slope tie-in: The dam should connect into the side slopes so water does not move around it.
- Downstream protection: The toe of the dam may need stone, vegetation, or another stable surface to prevent scour.
- Maintenance access: Sediment will often collect upstream, so inspection and cleanout access matter.
- Overflow route: Larger storms need a safe path that does not damage the swale or nearby areas.
Common Materials for Bioswale Check Dams
Check dams can be built from several materials. The right choice depends on whether the bioswale is residential, roadside, commercial, public, temporary, or permanent. It also depends on expected flow velocity, maintenance access, appearance, soil stability, and local design standards.
Stone is common because it is durable, familiar, and easy to shape into a permeable low barrier. Concrete, wood, metal, modular curbs, and engineered weir structures may appear in more formal bioretention or streetscape designs. Fiber rolls and similar products may be used for temporary stabilization or lower-flow conditions where allowed.
| Material | Typical Use | Main Strength | Main Caution |
|---|---|---|---|
| Stone or riprap | Residential swales, roadside swales, vegetated channels, retrofit projects. | Durable, flexible, and able to slow water while allowing some seepage. | Loose stones can shift if undersized or poorly keyed into the swale. |
| Concrete weir | Urban bioswales, curbside bioretention, commercial or public-space systems. | Provides a defined crest, notch, and ponding elevation. | Requires careful design, stable footing, and local review in many projects. |
| Timber or logs | Naturalistic swales, parks, low-flow landscape settings. | Blends with planted areas and can work where flow energy is modest. | May decay, move, or create gaps if not anchored well. |
| Compacted soil berm | Some landscape swales and small planted systems. | Can match the landform and support planting. | Can erode if not armored, planted, or protected from concentrated flow. |
| Metal, plastic, or modular weir | Engineered bioretention cells and tight urban sites. | Allows controlled crest height in limited space. | Material, anchoring, and edge sealing need careful detailing. |
| Fiber roll or compost sock | Temporary erosion control or low-energy flow areas. | Useful during establishment when vegetation is not dense yet. | May not suit permanent concentrated-flow locations. |
No material is best for every bioswale. A stone check dam may fit a planted residential drainage swale, while a concrete weir may suit a constrained streetscape where ponding elevation must be clear and repeatable. In higher-flow public areas, material selection often needs professional review.
Stone Check Dams
Stone check dams are widely used because they are simple and forgiving when sized and placed correctly. Water can pass through small voids, flow over the crest, and slow down as it moves through the rough surface.
The stone should be large enough to resist movement under expected flow. The dam should be shaped so the center is lower than the edges, with enough side tie-in to prevent bypass. In planted swales, stone should not bury vegetation zones that are needed for filtration and root growth.
Concrete or Hard-Edge Weirs
Concrete check dams and hard-edge weirs are common in formal bioswale and bioretention installations. They can define a precise ponding depth and create a clean overflow notch. They also handle repeated flows better than loose material when designed well.
They are less forgiving than stone. If the crest elevation, side connection, or downstream protection is wrong, water can scour around the structure. Concrete check dams may also need structural detailing, reinforcement, and review under local standards.
Wood, Logs, and Natural Materials
Wood check dams can suit naturalistic settings where visual character matters and runoff energy is not high. They can also help create a softer transition between planted zones.
The main issue is movement and decay. Wood must be anchored so it does not float, rotate, or leave an erosion gap beneath it. It should also be inspected over time because wet-dry cycles can change its condition.
How Check Dams Shape Water Movement
A bioswale works through a mix of surface flow, shallow ponding, soil contact, plant roughness, and drainage. Check dams adjust that mix. They slow water on the surface and give it more opportunity to spread across the swale bottom.
Behind each check dam, water may pond for a short period. Some water can infiltrate into the soil media. Some may move to an underdrain if the bioswale has one. Some may pass over the crest and continue downstream. The desired behavior depends on the site.
Where soils drain well, check dams can support infiltration by holding water long enough for the soil surface to accept it. Where soils are compacted or clay-heavy, check dams may create unwanted standing water unless the design includes amended soil, underdrainage, or another outlet strategy.
Drainage Note: A check dam should not create long-term standing water unless the bioswale was designed for that condition. Slow drain-down can point to compacted soil, clogged media, blocked underdrains, poor outlet elevation, or too much ponding depth for the site.
Placement Principles for Real Sites
Good placement starts with the swale profile. The designer needs to understand where water enters, how fast it travels, where it should pond, and where it leaves. Check dams are then placed to create controlled steps rather than random obstacles.
On a long slope, several low check dams may perform better than one taller dam. Shorter drops reduce flow energy in stages and make maintenance easier. Taller barriers can create deeper ponding, more side pressure, and more erosion risk at the outlet point.
1. Place Dams Across the Flow Path
A check dam should cross the swale in a way that intercepts the main flow. If it sits at an angle without a clear reason, water may collect along one side and cut a narrow channel. For most bioswales, the dam runs across the swale, with the crest shaped to guide overflow through the middle.
2. Tie the Ends into the Side Slopes
The ends of the check dam should be high enough and stable enough to keep water from escaping around the sides. This matters in both stone and hard-edged designs. Outflanking is one of the most common ways a check dam fails.
3. Protect the Downstream Toe
Water gains energy as it drops over a check dam. The area just downstream may need stone, dense vegetation, turf reinforcement, or another stable surface. Without protection, the drop can dig a small scour hole that grows over time.
4. Match Spacing to Slope and Ponding
Spacing should reflect how much elevation changes along the swale. On steeper slopes, dams may need to be closer together. On gentler slopes, fewer dams may be needed. The goal is usually to create a series of shallow, controlled ponding areas rather than deep isolated pools.
5. Keep the Overflow Route Clear
Every bioswale needs a way to handle water that exceeds the treatment volume. Check dams should support that route, not block it. During larger storms, water should move through the swale without eroding the bed, backing up into unwanted areas, or bypassing the system in an uncontrolled way.
Check Dam Height and Ponding Depth
Check dam height affects ponding depth, storage, plant wetness, and maintenance. Low check dams are often easier to integrate into vegetated swales because they create shallow ponding without turning the swale into a series of deep basins. Higher structures may be used in engineered systems, but they need more careful review.
Many design references keep bioswale ponding shallow, often within a range that allows plants to tolerate short wet periods and lets maintenance crews see sediment buildup. The exact depth should follow local standards, project goals, soil conditions, and the drain-down design.
A check dam should not raise water high enough to threaten nearby pavement, foundations, paths, planting beds, or neighboring property. The safe overflow route matters as much as the dam itself.
Site Planning Note: If a bioswale is near a building, basement, retaining wall, sidewalk, roadway, public drainage system, or property line, check dam height and overflow behavior should be reviewed with site-specific drainage conditions in mind.
How Check Dams Interact with Soil and Plants
Check dams change the moisture pattern inside a bioswale. The upstream side may stay wetter after storms, while the downstream side may drain sooner. This affects plant selection and soil performance.
Plants near check dams should tolerate short wet periods, sediment deposition, and occasional flow. Dense grasses, sedges, rushes, and suitable native perennials are often useful because their stems slow water and their roots help hold soil. Shrubs may work in some bioswales, but they should not block inspection, trap trash in a way that prevents maintenance, or force water into narrow side channels.
Soil media should resist compaction and allow water to drain at a rate appropriate for the site. If the soil surface seals with fine sediment, a check dam can make the problem more visible because water ponds longer behind it. That is not always a dam failure; it may show that pretreatment, sediment removal, or media restoration is needed.
Plant Zones Around a Check Dam
- Upstream ponding zone: Plants need tolerance for short wet periods and sediment buildup.
- Crest and edge zone: Vegetation should not weaken the dam or create bypass gaps.
- Downstream toe: Plants or armoring should resist flow from water dropping over the crest.
- Side slopes: Rooted cover helps reduce erosion where water spreads or recedes.
Common Check Dam Problems
Most check dam problems come from water finding a path that was not planned. It may flow around the ends, dig under the base, jump over the crest too fast, or collect sediment until the ponding area loses volume.
These problems are easier to fix when they are caught early. A small scour mark near the edge of a dam is a useful warning. So is sediment that buries plants, mulch floating downstream, or standing water that remains longer than expected after typical storms.
| Observed Issue | Likely Cause | Possible Response |
|---|---|---|
| Water cuts around the dam ends | Ends are too low, poorly tied into side slopes, or not armored. | Raise and stabilize edges, reshape the crest, and repair side slope erosion. |
| Scour hole below the dam | Drop energy is too strong at the downstream toe. | Add stable stone, dense vegetation, or another approved energy control detail. |
| Long-standing water behind the dam | Compacted soil, clogged surface, blocked outlet, or too much ponding depth. | Inspect drain-down path, remove sediment, and review soil or underdrain conditions. |
| Stone moves downstream | Stone is too small, poorly placed, or exposed to higher flow than expected. | Rebuild with suitable material and review flow velocity and crest shape. |
| Plants fail upstream | Moisture period, sediment depth, or flow stress exceeds plant tolerance. | Adjust plant selection, remove excess sediment, and check ponding depth. |
Maintenance Around Bioswale Check Dams
Check dams collect sediment by design. That means they need inspection. Sediment that settles upstream can help keep particles from moving through the bioswale, but too much buildup can reduce ponding volume, smother plants, and push flow around the edges.
Maintenance should focus on the parts of the system that show how water is moving: the upstream sediment zone, the crest, the side tie-ins, the downstream toe, the inlet, and the outlet. After larger storms, these areas often reveal whether the check dam is working as intended.
What to Inspect
- Sediment depth upstream of each check dam.
- Scour or undercutting below the overflow point.
- Water marks that show bypass around the ends.
- Loose stone, displaced logs, cracked concrete, or exposed edges.
- Mulch movement that suggests flow is too concentrated.
- Plant stress in ponding zones or along side slopes.
- Blocked notches, clogged openings, or debris trapped at the crest.
Routine maintenance does not need to be complicated, but it needs to be consistent. Remove excess sediment before it changes the flow path. Replace dead plants where root cover is needed for stability. Keep the designed low point open so overflow does not seek a weaker path.
Maintenance Note: Sediment behind a check dam should be treated as a normal inspection item, not as a surprise. If sediment keeps returning quickly, the upstream runoff source may need pretreatment, stabilization, or better inlet design.
Where Check Dams Differ from Other Bioswale Features
Check dams are sometimes confused with berms, weirs, inlets, outlets, and underdrains. These features can work together, but they do different jobs.
A check dam slows and steps surface flow inside the swale. A berm may shape storage or separate one planting zone from another. A weir controls overflow elevation more precisely. An underdrain moves water below the soil media when infiltration alone is not enough. An overflow outlet gives excess water a safe exit.
In a simple landscape swale, one stone check dam may do enough. In a public or commercial bioswale, the check dam may be part of a more detailed drainage system with curb openings, pretreatment, engineered soil media, underdrains, overflow structures, and maintenance access points.
When a Check Dam May Not Be the Right Fix
A check dam helps manage flow within the bioswale. It does not fix every problem upstream or downstream. If runoff is too large for the swale, if the inlet sends water in as a high-energy stream, or if the overflow route is missing, adding check dams may only move the problem.
Check dams may also be a poor fit where the swale is already flat, where soils drain very slowly without an outlet, where maintenance access is limited, or where added ponding could affect nearby structures. In those cases, the better solution may involve inlet redesign, soil media changes, underdrainage, a different overflow structure, or a different stormwater practice.
Professional Review Is Sensible When
- The bioswale receives runoff from a parking lot, roadway, or large roof area.
- The site has steep grades or visible erosion.
- Water could back up toward a building, basement, path, road, or neighboring property.
- The bioswale connects to a public drainage system.
- Local standards set required ponding depth, drain-down time, materials, or inspection access.
- The design includes concrete weirs, underdrains, structural walls, or large overflow events.
For small residential swales, check dams can be simple. For larger or higher-risk drainage areas, they become hydraulic control elements and should be treated that way.
FAQ
What is the purpose of a bioswale check dam?
A bioswale check dam slows runoff, creates shallow temporary ponding, reduces erosion, and helps water spread through the swale. It supports filtration and infiltration but does not replace proper sizing, outlet design, or an overflow route.
Where should check dams be placed in a bioswale?
Check dams are usually placed across the swale flow path where the slope needs to be broken into shorter steps. Their spacing depends on grade, dam height, ponding depth, soil conditions, and how water enters and exits the bioswale.
What materials can be used for bioswale check dams?
Common materials include stone, riprap, concrete, timber, compacted soil berms, metal or plastic weirs, and some temporary fiber products. The right material depends on flow energy, site use, maintenance access, appearance, and local design requirements.
Can check dams cause standing water?
They can create temporary ponding by design. Water that remains much longer than expected may point to compacted soil, clogged media, poor outlet elevation, blocked underdrainage, or too much ponding depth for the site.
Do all bioswales need check dams?
No. Flat or gently sloped bioswales may not need them. Check dams are most useful where runoff moves too quickly, where the swale needs stepped ponding, or where erosion control is needed along a sloped flow path.
How are check dams maintained?
Maintenance usually includes removing excess sediment upstream of the dam, checking for erosion around the ends, keeping the overflow notch clear, repairing displaced material, and replacing plants where root cover is needed for stability.